In this tutorial we are going to learn how to develop a SOAP web service using Spring boot and Apache CXF. We will follow the contract first approach to develop our service where we will use jaxb2 maven plugin to generate the java classes which we will use for service implementation.
Here we will create a maven project. There are multiple ways to create a maven project like using IDE features, maven command or using spring initializer (http://start.spring.io/).
Below are the steps given in sequence which we will follow to develop our service.
Once your application is started, please enter below URL in browser.
http://localhost:8080/helloService?wsdl
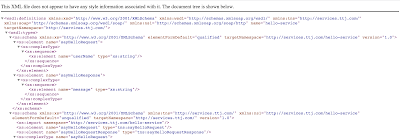
If you are able to see the WSDL content then it means your service is up and ready for testing. You will see similar screen as given below.
Now open the SoapUI and create a new Soap Project by giving the above WSDL URL. It will create a project with sample request also.
Open the request XML and verify that it has correct name space for service schema, if not then you can add it there. In my case it didn't add all namespace, so I added it manually. Now execute the request and you will see the response with hello message as given below.
https://github.com/thetechnojournals/spring-tutorials/tree/master/CxfSoapService
https://www.thetechnojournals.com/2020/02/xml-validation-using-xsd-schema.html
Why contract first
With contract first our primary focus stays with the contract of service to be implemented. Also it is useful to match the input/output with business requirement. We can share the contract with other business units/ customers or users, so it helps them to start early without waiting for the complete implementation. Once our contract is ready we can generate the Java classes using jaxb plugin which generates the java objects using the schema for SOAP contract and we need to focus only on service implementation.SOAP service development (Hello service)
This service will have one operation where user can send their name and in response they will get a hello message with the passed name.Here we will create a maven project. There are multiple ways to create a maven project like using IDE features, maven command or using spring initializer (http://start.spring.io/).
Below are the steps given in sequence which we will follow to develop our service.
Maven dependencies
I have used Spring boot version as 2.2.2.RELEASE using below parent tag declaration. <parent>
<groupId>org.springframework.boot</groupId>
<artifactId>spring-boot-starter-parent</artifactId>
<version>2.2.2.RELEASE</version>
<relativePath/>
</parent>
Add below dependencies for spring web and Apache CXF. <dependency>
<groupId>org.springframework.boot</groupId>
<artifactId>spring-boot-starter-web</artifactId>
</dependency>
<dependency>
<groupId>org.apache.cxf</groupId>
<artifactId>cxf-spring-boot-starter-jaxws</artifactId>
<version>3.3.4</version>
</dependency>
Service contract using XML schema
Service contract is defined below using XML schema where we have defined request and response schema. Request contains one parameter for user name to pass in request and response has one parameter to send the response message.<xs:schema xmlns:xs="http://www.w3.org/2001/XMLSchema"
xmlns:tns="http://services.ttj.com/hello-service"
targetNamespace="http://services.ttj.com/hello-service" elementFormDefault="qualified">
<xs:element name="sayHelloRequest">
<xs:complexType>
<xs:sequence>
<xs:element name="userName" type="xs:string"/>
</xs:sequence>
</xs:complexType>
</xs:element>
<xs:element name="sayHelloResponse">
<xs:complexType>
<xs:sequence>
<xs:element name="message" type="xs:string"/>
</xs:sequence>
</xs:complexType>
</xs:element>
</xs:schema>
Java classes generation from XSD contract
Add below plugin to pom.xml. Specify the schema location in schemDirectory tag and package location for new classes as given below. Please refer the link https://www.thetechnojournals.com/2019/10/jaxb2-maven-plugin-to-generate-java.html for more details on class generation from XML schema. <plugin>
<groupId>org.codehaus.mojo</groupId>
<artifactId>jaxb2-maven-plugin</artifactId>
<version>1.6</version>
<executions>
<execution>
<id>xjc</id>
<goals>
<goal>xjc</goal>
</goals>
</execution>
</executions>
<configuration>
<schemaDirectory>${project.basedir}/src/main/resources/schema</schemaDirectory>
<outputDirectory>${project.basedir}/src/main/java</outputDirectory>
<clearOutputDir>false</clearOutputDir>
</configuration>
</plugin>
Now build the project using maven build. It will generate the new package and classes using the XML contract. Once these classes are generated, we can proceed with further stepsCXF servlet and bus configuration
We need to create a servlet dispatcher bean to map the services URL with CXF servlet. Also we will create a SpringBus bean, however you don't need to create the SpringBus bean but if you want to add some additional features like interceptors, security etc. then you should declare this bean and bind additional features to it.@Configuration
public class CxfConfig {
@Bean(name = Bus.DEFAULT_BUS_ID)
public SpringBus springBus(){
SpringBus bus = new SpringBus();
return bus;
}
@Bean
public ServletRegistrationBean<CXFServlet> messageDispatcherServlet(
ApplicationContext applicationContext, SpringBus springBus){
CXFServlet cxfServlet = new CXFServlet();
cxfServlet.setBus(springBus);
return new ServletRegistrationBean<>(cxfServlet, "/*");
}
}
Service implementation
Now we will create the service class which will read the soap request and generate the response accordingly. It can be implemented by creating interface also but here I am creating only implementation class. If you create through interfaces please put all annotations to interface and then implement in your service class.@WebService(serviceName = "hello-service")
public class HelloServiceEndpoint {
@WebMethod(action="sayHello", operationName = "sayHelloRequest")
@WebResult(name = "message")
public String sayHello(SayHelloRequest request){
return "Hello "+request.getUserName()+"!!!";
}
}
Service endpoint configuration
Finally we need to create the endpoint for our web service which will be published using the specified endpoint.@Configuration
public class SoapEndpointsConfig {
@Bean
public Endpoint endpoint(SpringBus bus) {
EndpointImpl endpoint = new EndpointImpl(bus, new HelloServiceEndpoint());
endpoint.publish("/helloService");
return endpoint;
}
}
Running and testing web service using SOAP UI
Now build the maven project and run it using below command.Once your application is started, please enter below URL in browser.
http://localhost:8080/helloService?wsdl
If you are able to see the WSDL content then it means your service is up and ready for testing. You will see similar screen as given below.
Now open the SoapUI and create a new Soap Project by giving the above WSDL URL. It will create a project with sample request also.
Open the request XML and verify that it has correct name space for service schema, if not then you can add it there. In my case it didn't add all namespace, so I added it manually. Now execute the request and you will see the response with hello message as given below.
Source code
You can download the complete source code form below github location.https://github.com/thetechnojournals/spring-tutorials/tree/master/CxfSoapService
Other posts you may be interested in:
https://www.thetechnojournals.com/2019/10/soap-request-ssl-signature-validation.htmlhttps://www.thetechnojournals.com/2020/02/xml-validation-using-xsd-schema.html


Gartic io Benzeri Oyunlar
ReplyDeleteA Way Out Benzeri Oyunlar
Fall Guys Benzeri Oyunlar
Roblox Benzeri Oyunlar
Candy Crush Benzeri Oyunlar
NQP